
n8n in Action: Automated AI Newsletter Generation and Publishing
n8n has been widely recognized as a core framework for "low-code × AI orchestration" within the Agentic AI ecosystem. It enables both developers and non-developers to seamlessly integrate traditional services (databases/HTTP APIs) with various large language models and vector retrieval systems through drag-and-drop operations, rapidly producing deployable automation scenarios.
This article will demonstrate how to use n8n to build an "AI News Collection and Publishing" pipeline that can automatically scrape news from multiple tech media sources, generate structured Chinese newsletters through OpenDataSky large language models, and publish them automatically. The entire process requires no backend coding-only node configuration on the n8n canvas.
What is n8n?
n8n (pronounced n-eight-n, an abbreviation for "nodes & numbers") is an open-source workflow automation and integration platform. It provides:
- Visual DAG Designer: Each node represents an API call, script execution, or AI inference
- 400+ Built-in Official/Community Nodes: Covering databases, messaging, cloud services, and LangChain AI components
- Conditional branching, error retry, centralized credential management, and version control
- JavaScript/TypeScript snippet support, balancing "no-code" with "customizable"
In essence, n8n is a freely assemblable "data + AI assembly line."
What Will This Tutorial Achieve?
Objective: One-click generation of "AI industry news from the past 24 hours" with automatic publishing. The workflow is illustrated as follows:
Scheduled Triggers:
- Every 4 hours: RSS scraping → feed into "Collection Pipeline"
- Daily at 09:00: Launch "Newsletter Generation Pipeline"
Collection Pipeline (Data Layer)
- Read RSS → Standardize JSON → Calculate MD5 for deduplication
- Embedding → Vector + metadata written to pgvector
Summary Pipeline (Semantic Layer/Content Layer)
- Keyword Embedding → Similarity search for top-K chunks
- LLM Prompt: Sort, translate, Markdown formatting
- Select publishing platform and call API for publication
Final Result: A well-formatted, Chinese-readable AI newsletter without manual intervention.
Technology Stack Overview
- n8n 1.93.0 + @n8n/n8n-nodes-langchain
- PostgreSQL 14 + pgvector 0.6 (n8n built-in vector storage also available)
- OpenDataSky API (OpenAI SDK compatible) Get API Key
How to Use n8n?
1. Web Version: Official n8n cloud service, visit n8n official website to login. (Requires paid subscription, 14-day free trial for new users) 2. Local Deployment: Deploy locally according to official documentation.
n8n also supports deployment in DataSky AI Box. This article is based on practical experience with DataSky AI Box deployment.
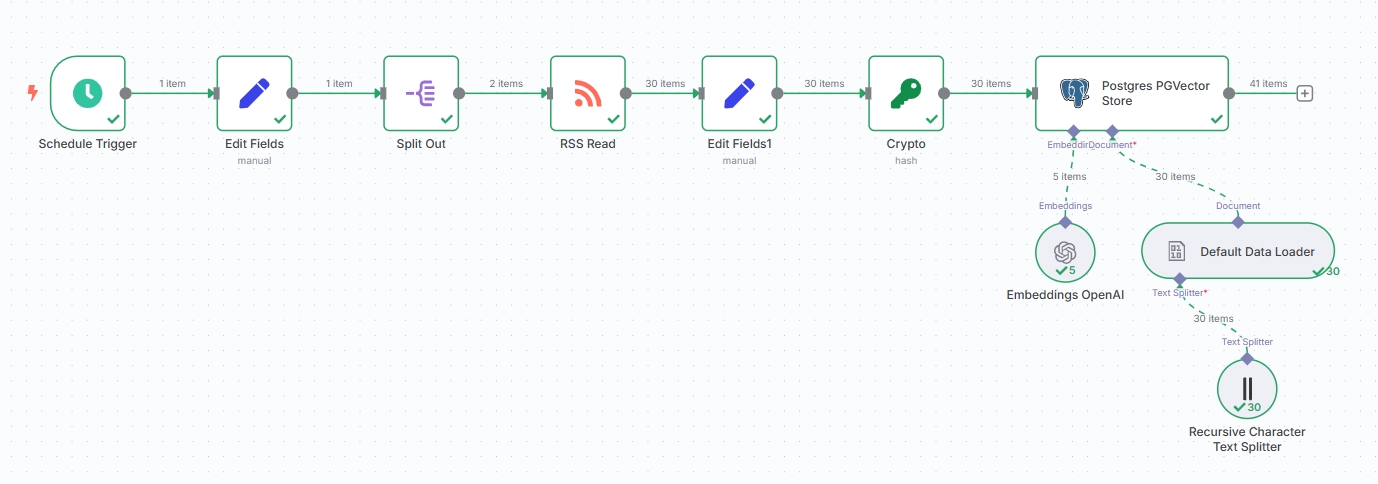
Orchestrating the Workflow
The entire automation system consists of two main independent workflows:
- News collection workflow
- Topic-based newsletter generation workflow
Let's break down these two workflows separately.
First, log into the n8n interface and click "Create Workflow" to create a blank workflow.
News Collection Workflow
Configure Scheduled Trigger
Click "Add first step..." and select "On a schedule" to create a scheduled trigger.
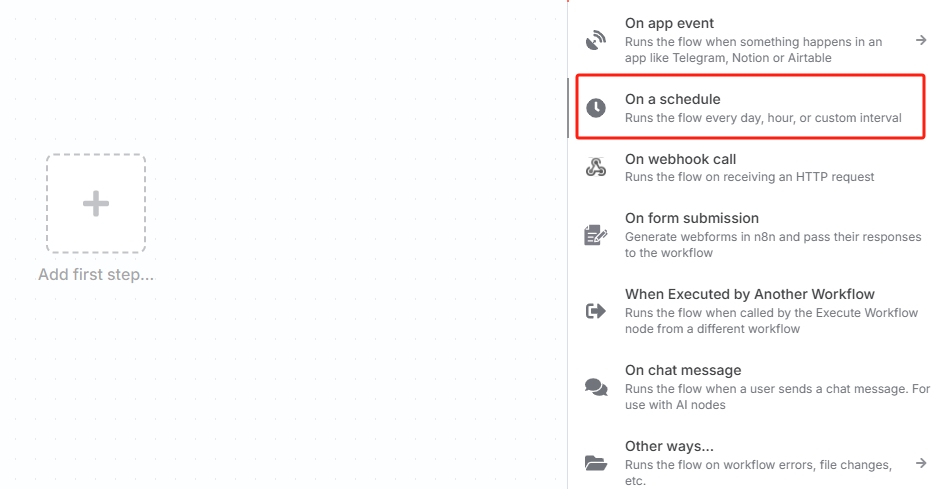
You can also choose other triggers based on actual needs. For automated workflow execution, a trigger must be the first node.
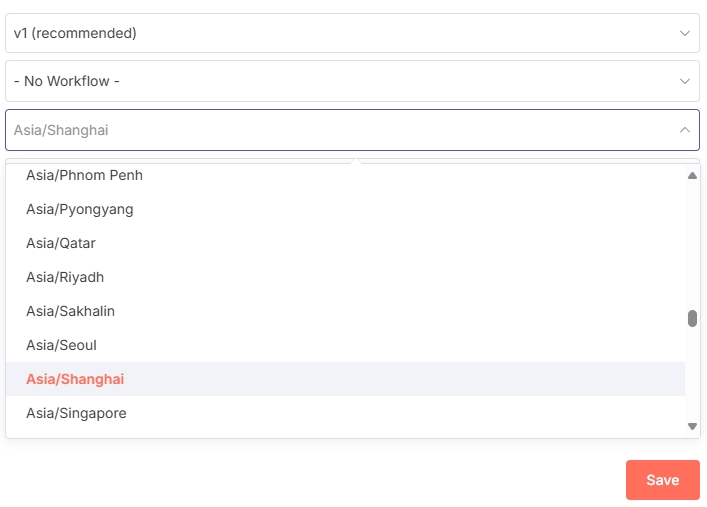
Note: Since n8n uses US timezone by default, modify the timezone to ensure the scheduler triggers as expected.
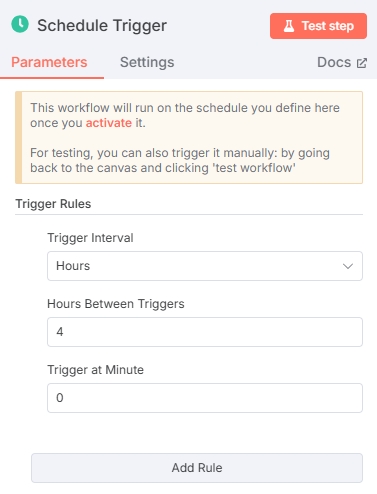
Open the "On a schedule" node to customize the timing configuration. Configure the trigger frequency as needed. Here we select triggering every 4 hours.
Alternative Triggers
You can also directly use the "RSS Feed Trigger". The RSS trigger also supports configuring trigger frequency.
Since the RSS trigger is inconvenient for adding multiple RSS news sources later, we recommend using "On a schedule" trigger first, then configuring RSS news sources in subsequent nodes. (If you only have one news source, you can use "RSS Feed Trigger")
Set RSS News Source URLs
Add an "Edit Fields" node after the scheduler to define the RSS URL array. Configure as follows:

The type must be "Array". Here's the input template:
[
  "https://feeds.arstechnica.com/arstechnica/index",
  "https://www.theverge.com/rss/index.xml",
  "...other RSS source URLs"
]
Click "Test Step" to test this node. The output should look like this:

RSS URLs can be found on various news media platforms
Split Array
Split the array from the previous node into different items for subsequent RSS reading nodes:
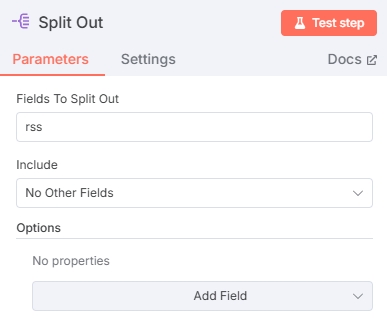
Test output:
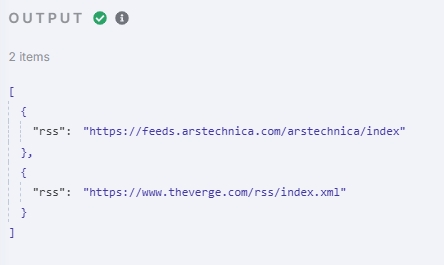
You can see the array has been successfully split, with 2 items.
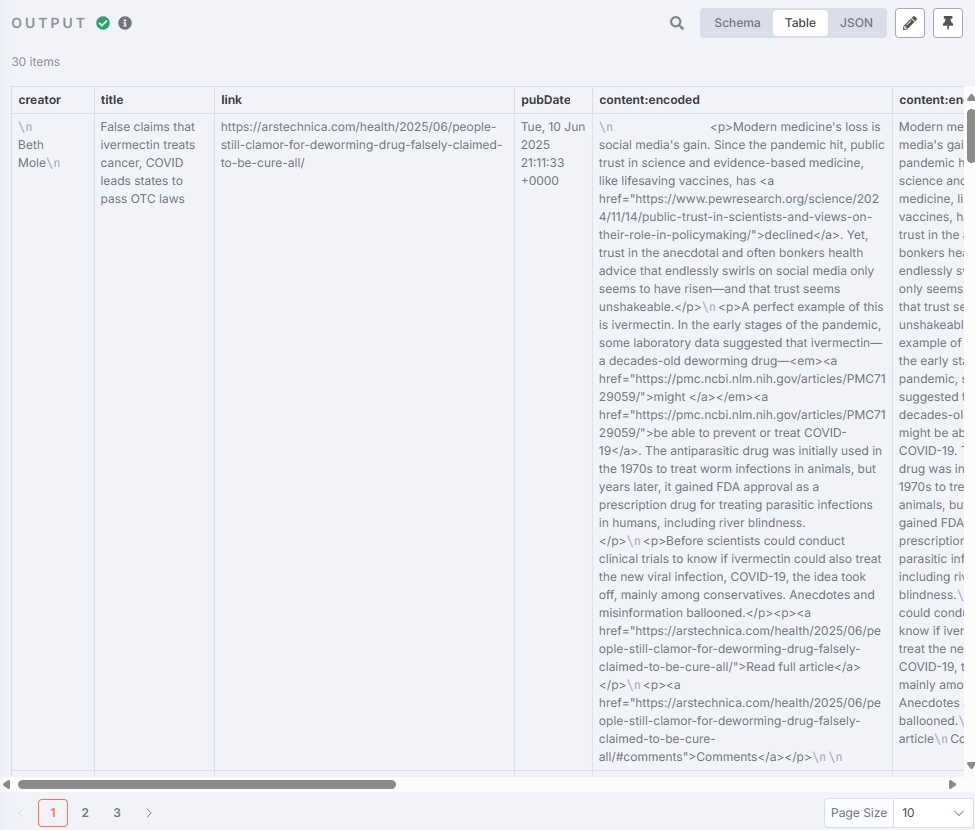
Read RSS News Sources
Add an RSS Read node to extract news content. In the URL field, input the rss variable from the previous node $json.rss. The RSS Read node will output news from each URL:
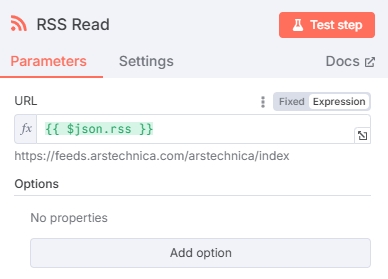
Test to get news content:
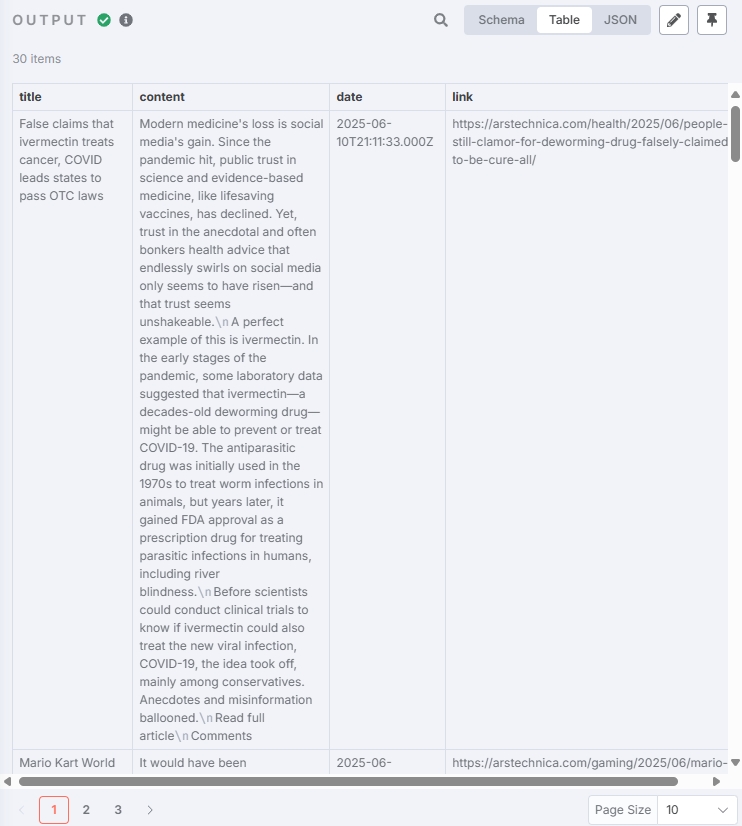
Extract Valid Fields
Add another "Edit Fields" node to extract the required valid fields for subsequent processing:
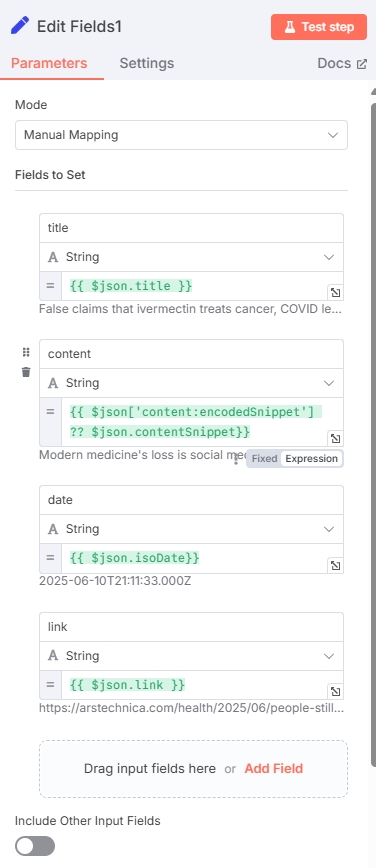
| Field Name | Field Type | Value (Variable) |
|---|---|---|
| title | String | $json.title |
| content | String | $json['content:encodedSnippet'] ?? $json.contentSnippet |
| date | String | $json.isoDate |
| link | String | $json.link |
Test output result:
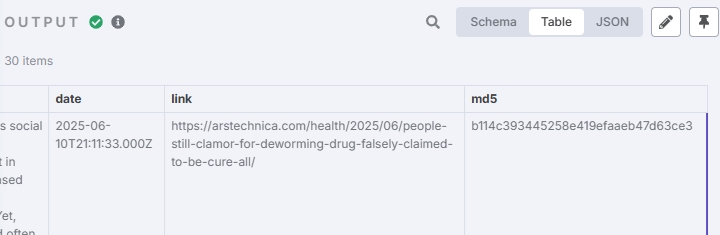
Generate Hash Value (Optional)
This node generates identifiers for article titles to facilitate deduplication:
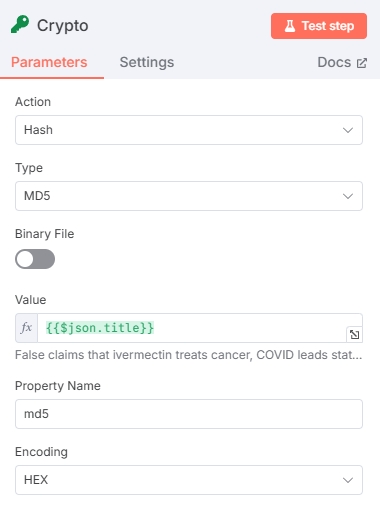
Test result:
Store News as Vector Data
Vector storage enables semantic search among large volumes of news, providing more topic-relevant articles. (If high precision isn't required, you can directly store in SQL and use simple keyword searches later)
Add a Vector Store node:
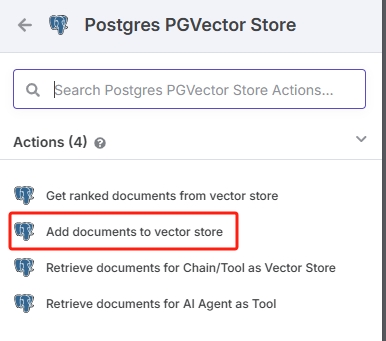
Besides the database node, vector storage requires 3 additional nodes: embedding model node, data loader, and text splitter.

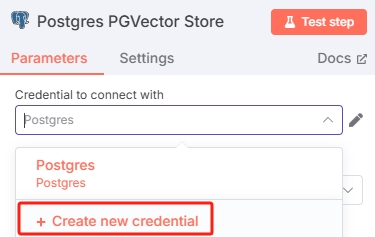
Configure Database Credentials
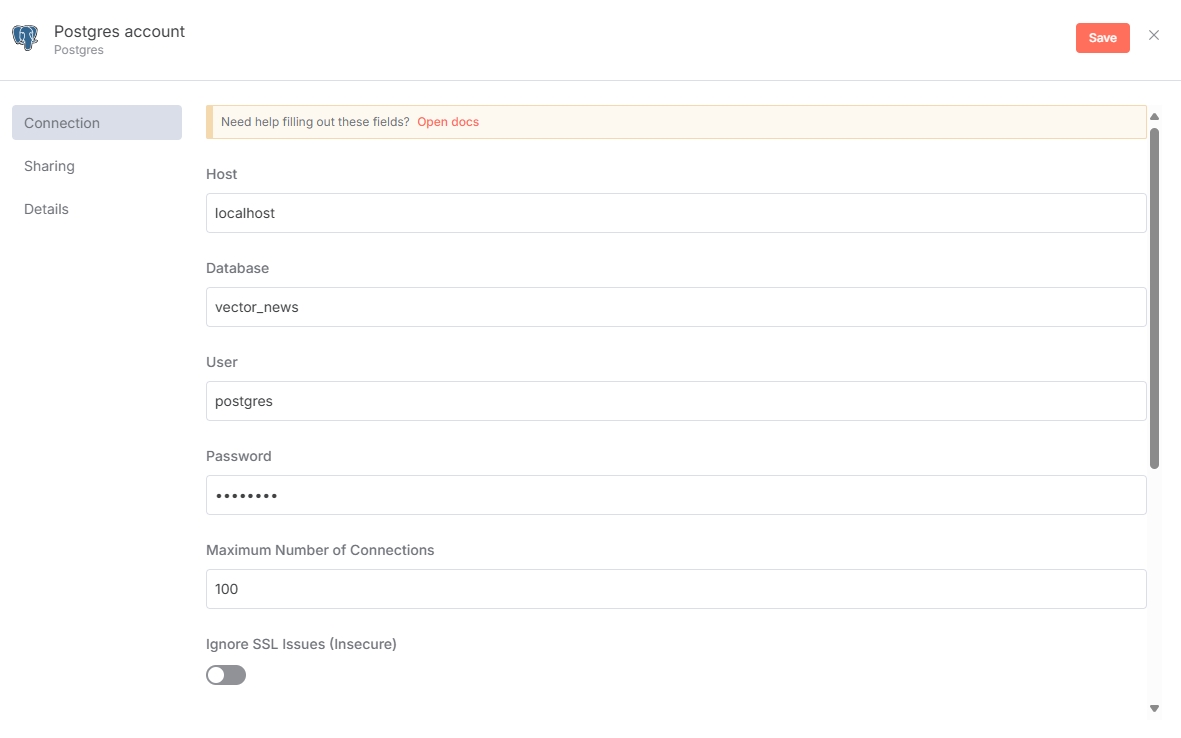
Open the Postgres PGVector Store node and add database credentials in "Credential to connect with":
Configure according to your database setup. Note: PostgreSQL needs the pgvector extension installed for vector storage functionality.
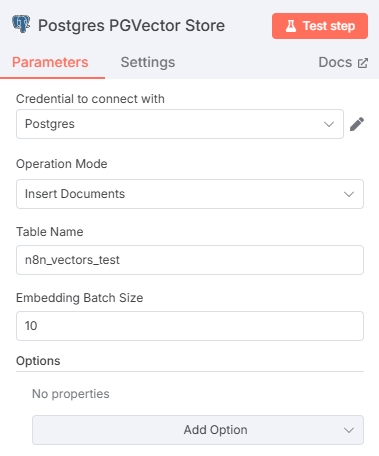
After adding database credentials, configure the Postgres PGVector Store node. Ensure the Table name doesn't conflict with existing database tables. The Embedding Batch Size parameter depends on the embedding model used.
Configure Embedding Model
Add embedding model resources in the Embeddings node. First, add API interface credentials. Enter OpenDataSky API here, with Base URL: http://server.opendatasky.com/v1/api/open-ai/ds, and get the API Key from the platform.
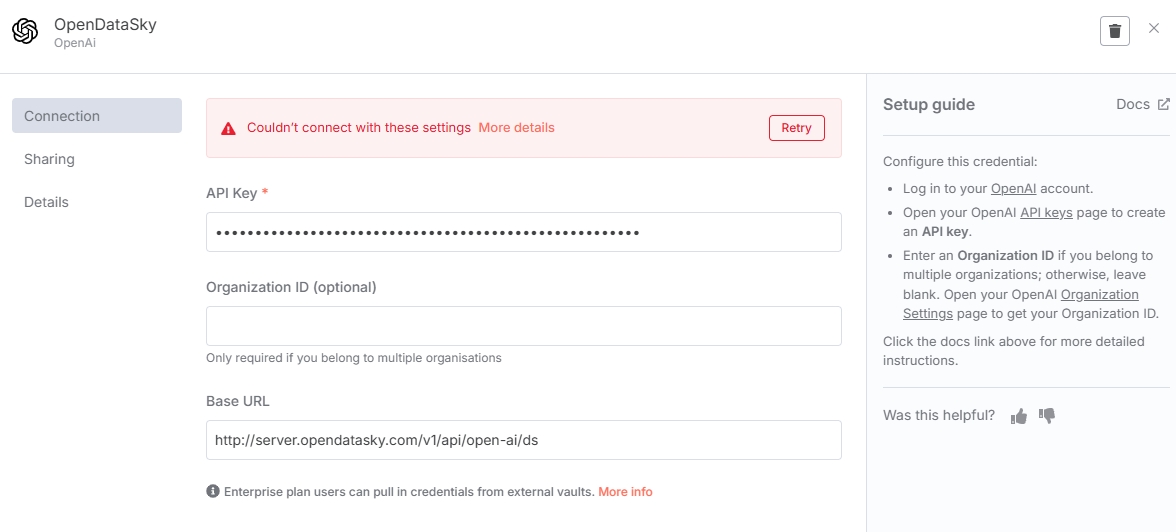
Note
When saving API credentials, n8n calls the /modellist interface for connectivity verification. Since OpenDataSky hasn't opened the /modellist interface yet, error messages will appear when clicking save-ignore them. (This won't affect subsequent model calls)
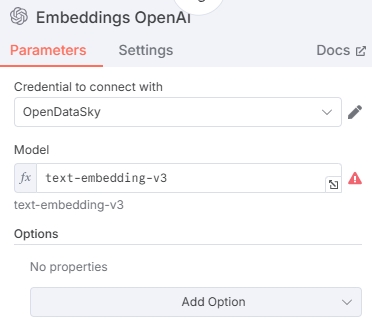
Enter the embedding model ID. Here we selected the Qwen series embedding model text-embedding-v3. Other models are also available. See Model List for supported models.
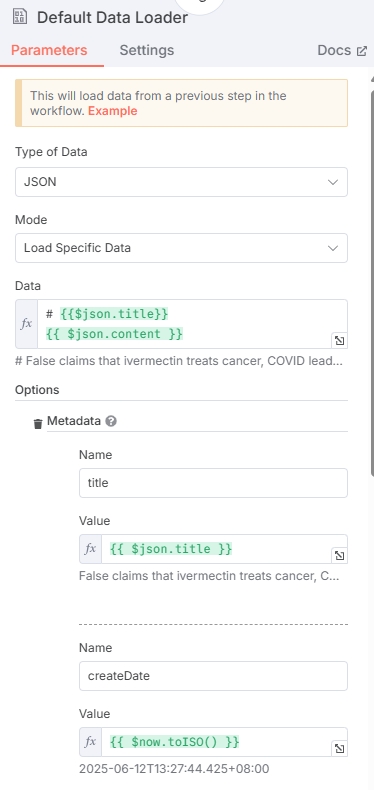
Configure Data Loader
The data loader processes news data from previous nodes. Select JSON for data type.
Since this data will be vectorized, selectively provide data for vectorization (like article titles and content). Choose "Load Specific Data" for Mode, and combine news title + content in Data field. Copy the variable below:
# {{$json.title}}
{{ $json.content }}
Additionally, configure Metadata, which will be stored as jsonb type in PostgreSQL. Configure title, hash, link, time to prevent data loss, and add other fields if needed (like createDate).
Click "Add Option" to configure Metadata according to the example:
| Name | Value |
|---|---|
| title | $json.title |
| createDate | $now.toISO() |
| publishDate | $json.date |
| link | $json.link |
| title_hash | $json.md5 |
Select "Expression" when filling Value fields
After configuring title_hash in metadata, you can add triggers in PostgreSQL to extract title_hash as a separate column during database writes for easier querying. (You can also query directly in metadata JSON without triggers)
Trigger example:
CREATE OR REPLACE FUNCTION extract_title_hash()
RETURNS trigger AS $$
BEGIN
  NEW.title_hash := NEW.metadata ->> 'title_hash';
  RETURN NEW;
END;
$$ LANGUAGE plpgsql;

CREATE TRIGGER trg_extract_title_hash
BEFORE INSERT OR UPDATE ON n8n_vectors_test
FOR EACH ROW EXECUTE FUNCTION extract_title_hash();
Note
Using this trigger requires the database to have a title_hash column. Manually create the title_hash column with text type.
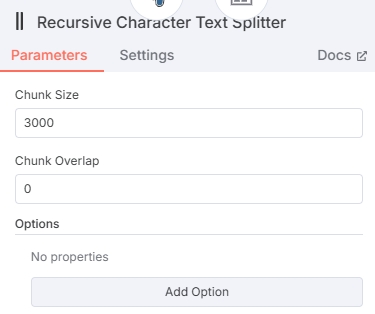
Configure Text Splitter
When adding a text splitter node, recommend selecting "Recursive Character Text Splitter" type, which splits news into complete paragraphs.
Set a reasonable Chunk Size within the node. No data overlap between chunks is needed, so set Chunk Overlap to 0. (Chunk Size shouldn't be too high to avoid exceeding embedding model Max Tokens)
Testing
After configuring vector storage according to the above steps, click "Test step" in the "Postgres PGVector Store" node.
Test result should be:
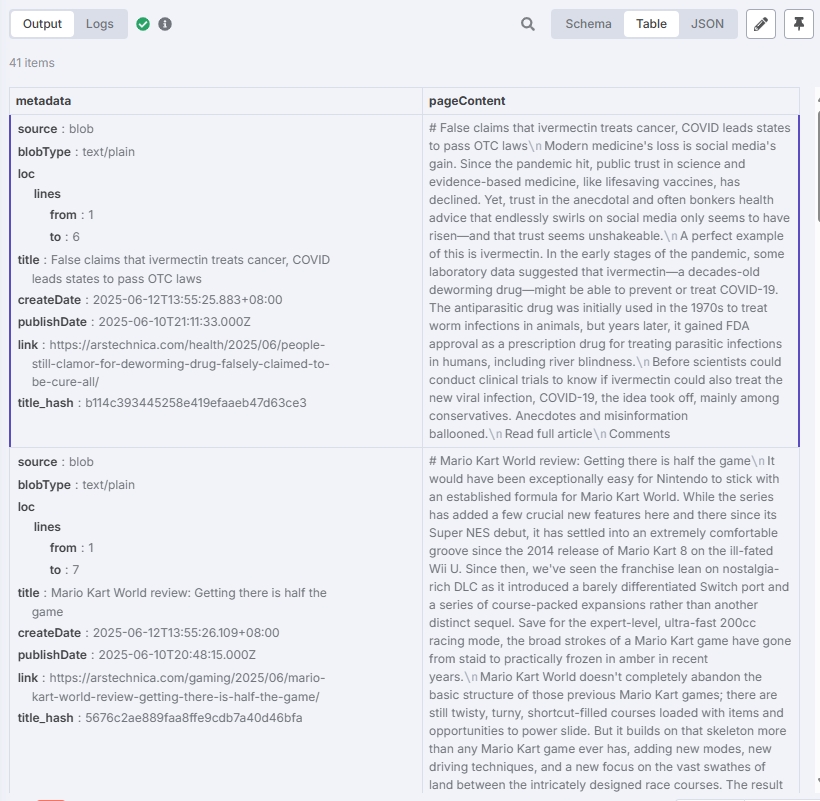
You can see articles have been stored in the database.
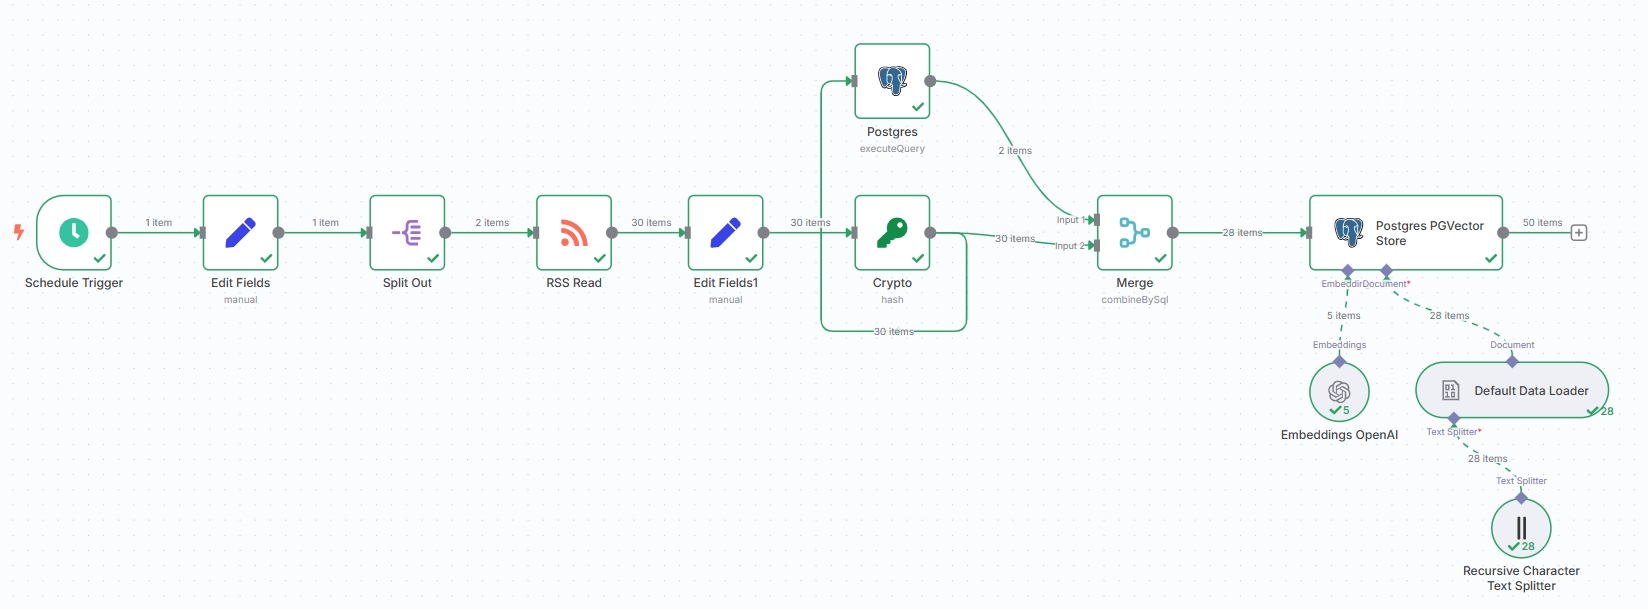
Current workflow nodes should look like:
Note
You can also replace Postgres PGVector Store with n8n's built-in "Simple Vector Store", but Simple Vector Store isn't suitable for persistent storage and can't perform subsequent deduplication work, so it's not recommended.
Article Deduplication (Optional)
Since we added the Generate Hash Value node earlier, we can use the generated hash values to filter duplicate articles.
Deduplication requires two nodes: "Postgres" and "Merge" for querying and merging respectively. First, disconnect the Generate Hash Value node from the database storage connection, with other nodes providing output to the database node later.
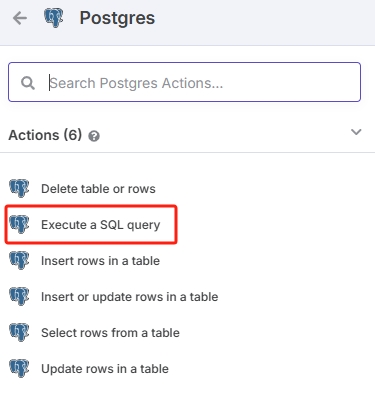
Postgres Node
Using the Generate Hash Value node as output, add a new node.
Select Postgres node with SQL query action. Don't confuse with "Postgres PGVector Store" node-"Postgres PGVector Store" and "Postgres" are different types.
Following the previous workflow, input the query statement in this node to find duplicate hashes:
SELECT DISTINCT title_hash FROM n8n_vectors_test WHERE title_hash IN ('{{ $json.md5 }}');If you didn't create the title_hash trigger following the above steps (database has no title_hash column, only metadata), use this command for deduplication:
SELECT DISTINCT metadata->>'title_hash' AS title_hash
FROM n8n_vectors_test
WHERE metadata->>'title_hash' IN ('{{ $json.md5 }}');
Configuration and test results:
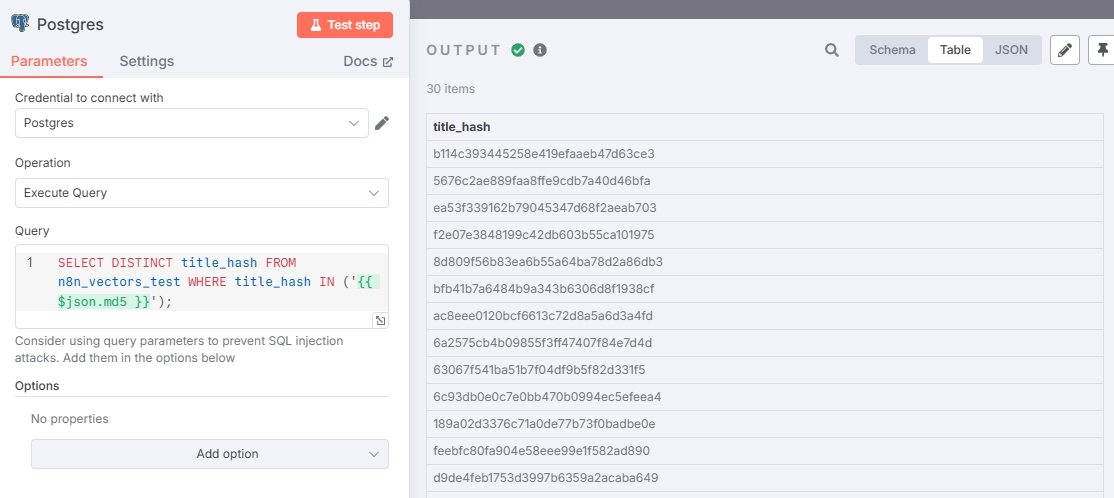
Since no new data was captured, all hash values in the test are duplicates, indicating correct output.
Merge Node
Add a Merge node with both Generate Hash Value and Postgres node as inputs.
As shown, connect Postgres node to Input 1 and Generate Hash Value node to Input 2.

The Merge node uses SQL queries to filter out duplicate articles:
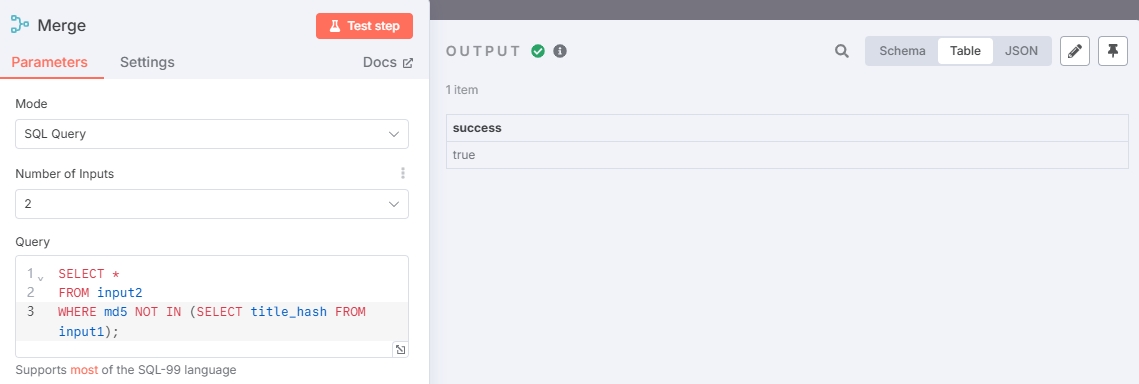
Query statement:
SELECT *
FROM input2
WHERE md5 NOT IN (SELECT title_hash FROM input1);
Since data hasn't been updated, all articles are duplicates, so no non-duplicate articles are output. You can add other RSS addresses for retesting (or wait for current RSS to output new news).
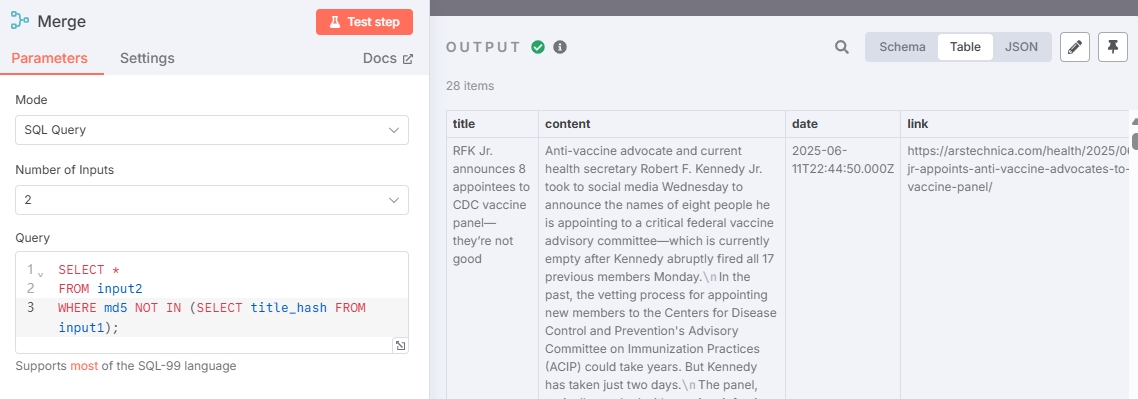
Connect the deduplicated news to the "Postgres PGVector Store" node to complete the entire news storage workflow.
Complete news collection workflow:
Retrieve Relevant News and Generate Newsletter
Configure Scheduled Trigger
Since this is a new independent workflow, start with configuring the trigger. Configuration is the same as News Collection Scheduled Trigger.
Add Vector Retrieval Node
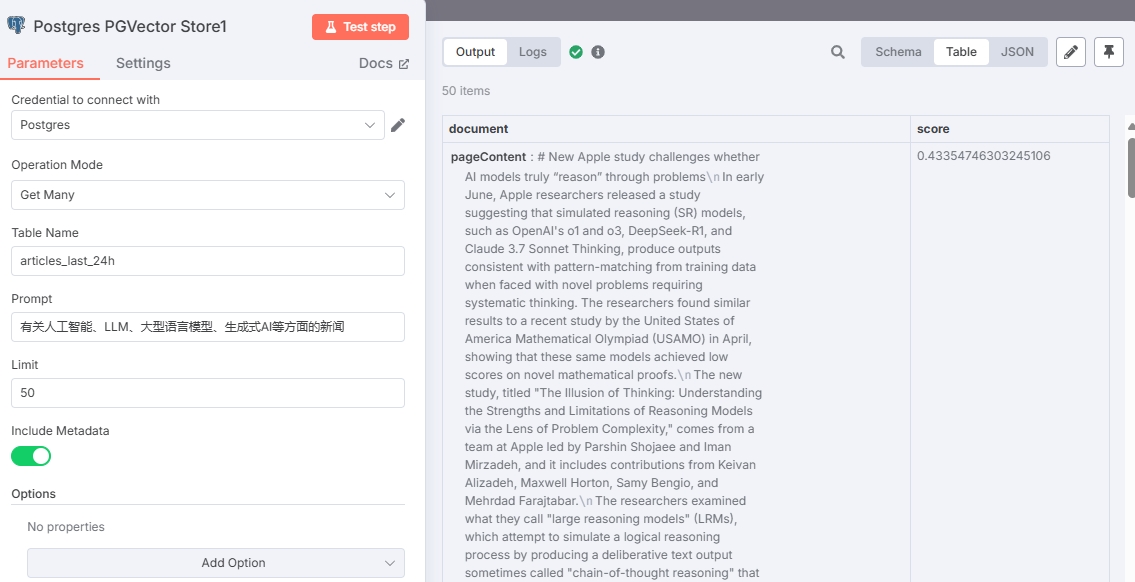
Retrieve relevant news through vector search. Add Postgres PGVector Store node with Actions set to "Get ranked documents from vector store."
![]()
Select the database and table from the News Collection workflow. Write the Prompt according to the topics you want to retrieve. Input an appropriate Limit value to restrict article output quantity. Enable "Include Metadata" option.
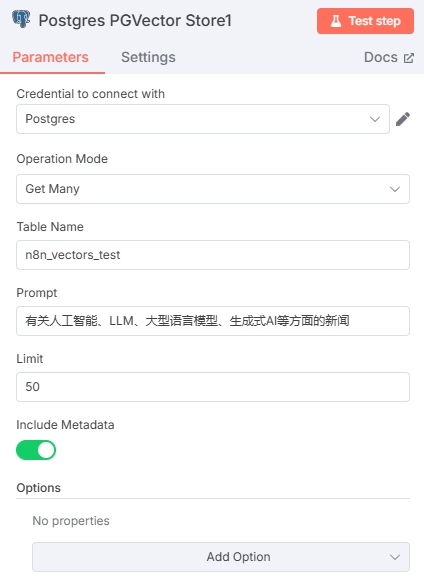
- Recommend complete sentences for Prompt for more accurate semantic retrieval.
To filter by news time, recommend adding time-filtered views in PostgreSQL and filling the view name in the Table Name field for retrieving qualified news.
View creation example (only provides news with publishDate within 24 hours):
CREATE OR REPLACE VIEW articles_last_24h AS
SELECT *
FROM n8n_vectors_test
WHERE (metadata->>'publishDate')::timestamptz >= NOW() - INTERVAL '24 hours';
Now fill articles_last_24h in the Table Name field of the Postgres PGVector Store node to retrieve only news within 24 hours.
Add Embedding
Connect this node's Embedding to the previously configured "Embeddings OpenAI" node from the Store News as Vector Data step. You can also create a new "Embeddings OpenAI" node (Note: must use the same model as the previous Embedding node).
Test result:
Due to n8n's query method, score values represent Euclidean distance (L2), so lower score values indicate higher similarity.
Filter High-Similarity Content/Chunks
The previous node retrieved the 50 most similar articles (determined by Limit), but among these 50, there may be articles with low similarity. Therefore, we need a node to filter articles that meet similarity (score value) criteria.
Add a Filter node, configured as shown:
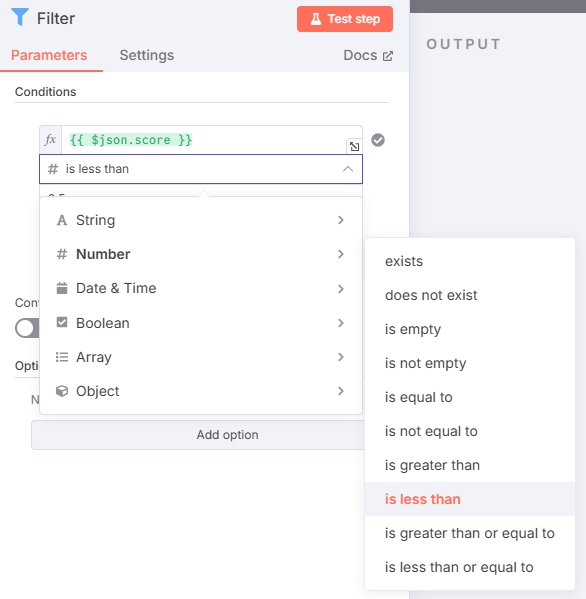
Input an appropriate value to filter out articles with scores higher than this value. (Higher score values mean lower similarity. In the example, the filter value is set to 0.5, adjust based on actual testing)
Test result:
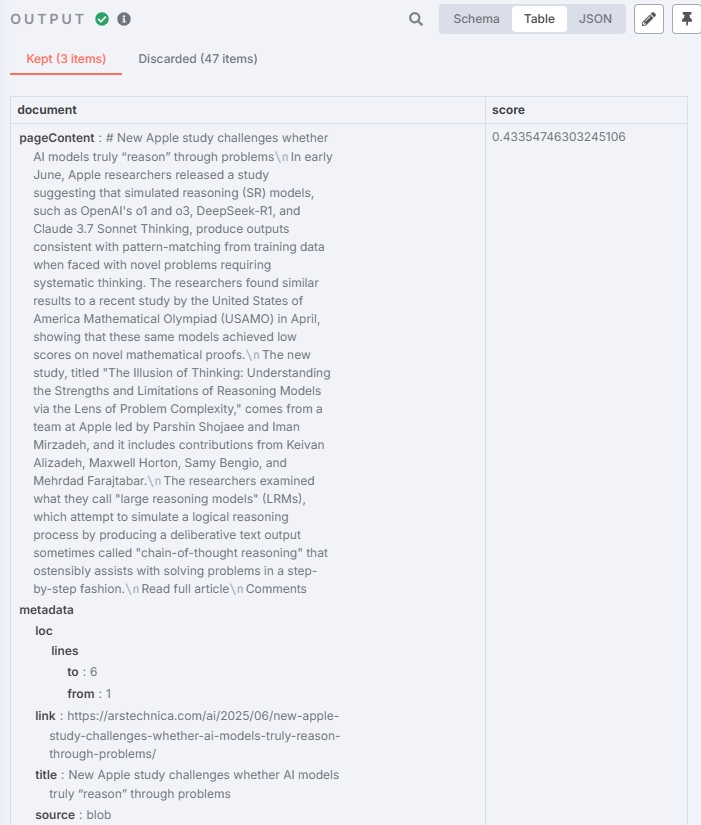
Successfully filtered relevant news chunks with expected results.
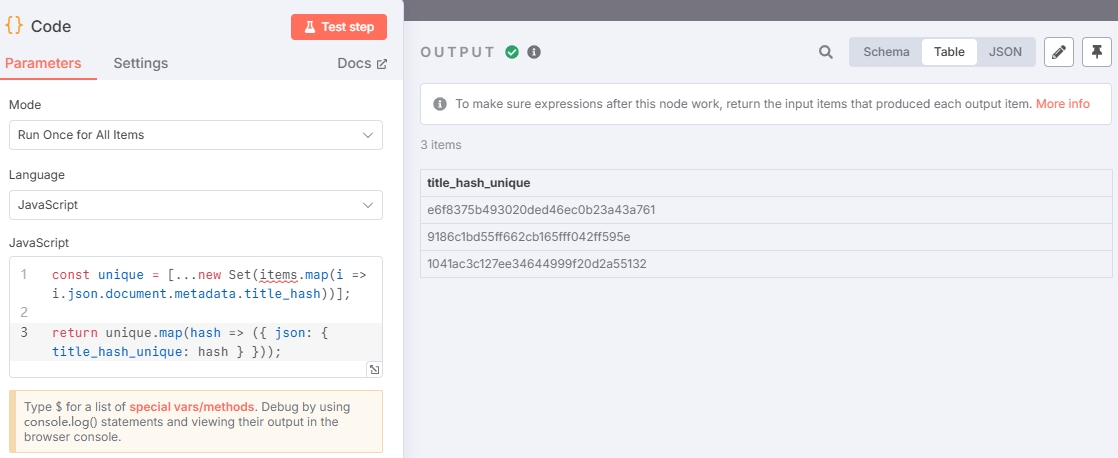
Extract Hash Values from Chunks (Optional)
Since the previous step filtered data as news chunks, long articles will be split into several chunks by the text splitter. Sending these chunks to the large model might result in incomplete articles. Here we can extract matched hash values and use them to reassemble complete articles.
Select the "Code" node with this example:
const unique = [...new Set(items.map(i => i.json.document.metadata.title_hash))];

return unique.map(hash => ({ json: { title_hash_unique: hash } }));
Output result:
Use Hash to Reassemble Complete Articles (Optional)
Add a PostgreSQL query node:
Use the hash output from the previous step to query the database and reassemble articles with a single SQL statement:
WITH parts AS (
SELECT
title_hash,
text,
metadata ->> 'link' AS link,
metadata ->> 'title' AS title,
metadata ->> 'publishDate' AS publish_date,
(metadata #>> '{loc,lines,from}')::int AS line_from,
(metadata #>> '{loc,lines,to}')::int AS line_to
FROM n8n_vectors_test
WHERE title_hash IN ('{{ $json.title_hash_unique }}')
)
SELECT
title,
string_agg(text, ' ' ORDER BY line_from, line_to) AS body,
link,
publish_date
FROM parts
GROUP BY
title_hash,
link,
title,
publish_date
ORDER BY
title_hash,
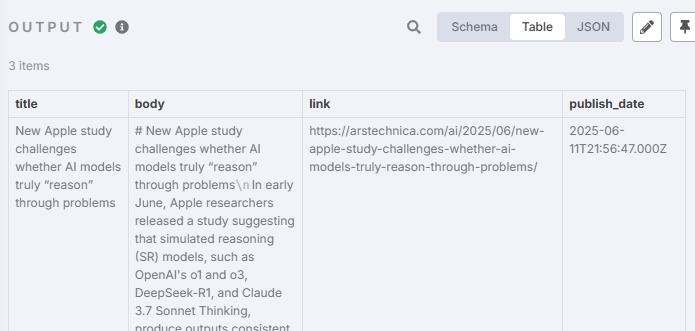
publish_date;Output result:
TIP
If you set a large Chunk Size in the Store News step so that article content isn't split into multiple chunks, you can completely skip the Extract Hash and Reassemble Articles steps.
Merge Items
To send all articles to the large model together, merge the items output from the above steps into one. Otherwise, the large model will make individual requests based on the number of items.
Use the "Code" node again with example code:
const arr = items.map(item => item.json); // Get all output content
return [
  {
    json: {
      myArrayStr: JSON.stringify(arr), // Convert to string
    }
  }
];
Output result:
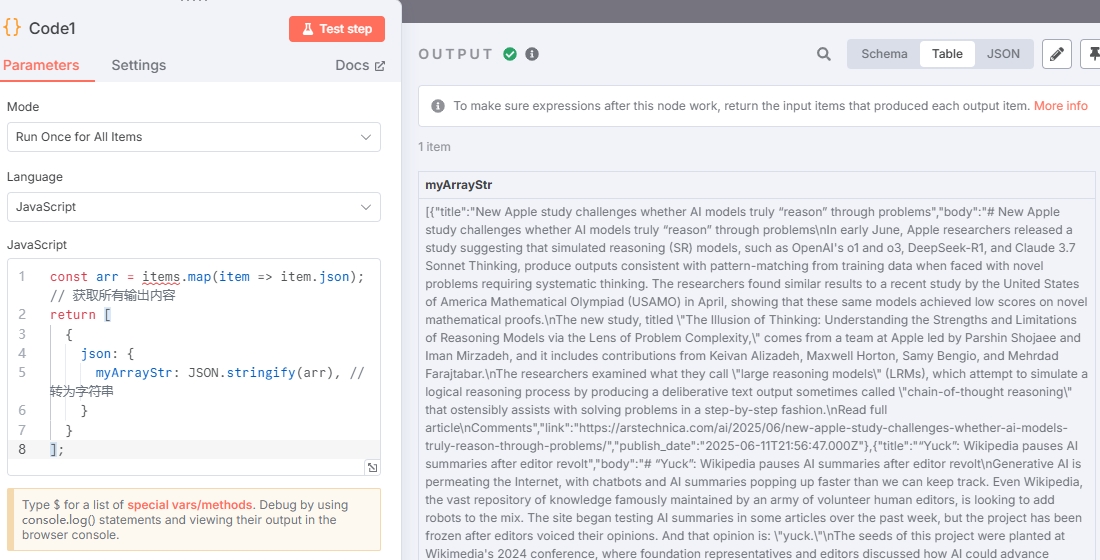
You can see there's only one item now.
Generate Newsletter
Now you can send the news materials to the large model for summarization.
Add an AI Agent node with "Source for Prompt" set to "Define below" for custom prompts. Simple prompt example:
You are a professional news editor. Please summarize an AI-related news report based on the following materials:
{{ $json.myArrayStr }}
You also need to add a large model (Chat Model). Select "OpenAI Chat Model". Since OpenDataSky API credentials were provided when configuring the embedding model earlier, you only need to input the Model ID here.
See OpenDataSky supported Chat Models
Test output using gpt-4.1-mini-2025-04-14:

Optimize the prompt according to requirements to achieve expected results.
Send Newsletter
Subsequent steps are entirely based on requirements and preferences. Common methods include: using HTTP Request nodes to connect various platforms for automated sending, or using Send Email to send emails. You can also use n8n's built-in nodes for simpler configuration.
Using QQ email as an example, you need to add QQ email credentials in the Send Email node. User is your email address, Host is the official address smtp.qq.com, and Password requires generating an authorization code in QQ email settings (QQ email login password cannot be used for third parties). Use default Port and SSL/TLS settings (465 and enabled).
Simple guide:
QQ Web Email -> Settings -> Account -> POP3/IMAP/SMTP/Exchange/CardDAV/CalDAV ServicesGenerate authorization code here following the instructions.
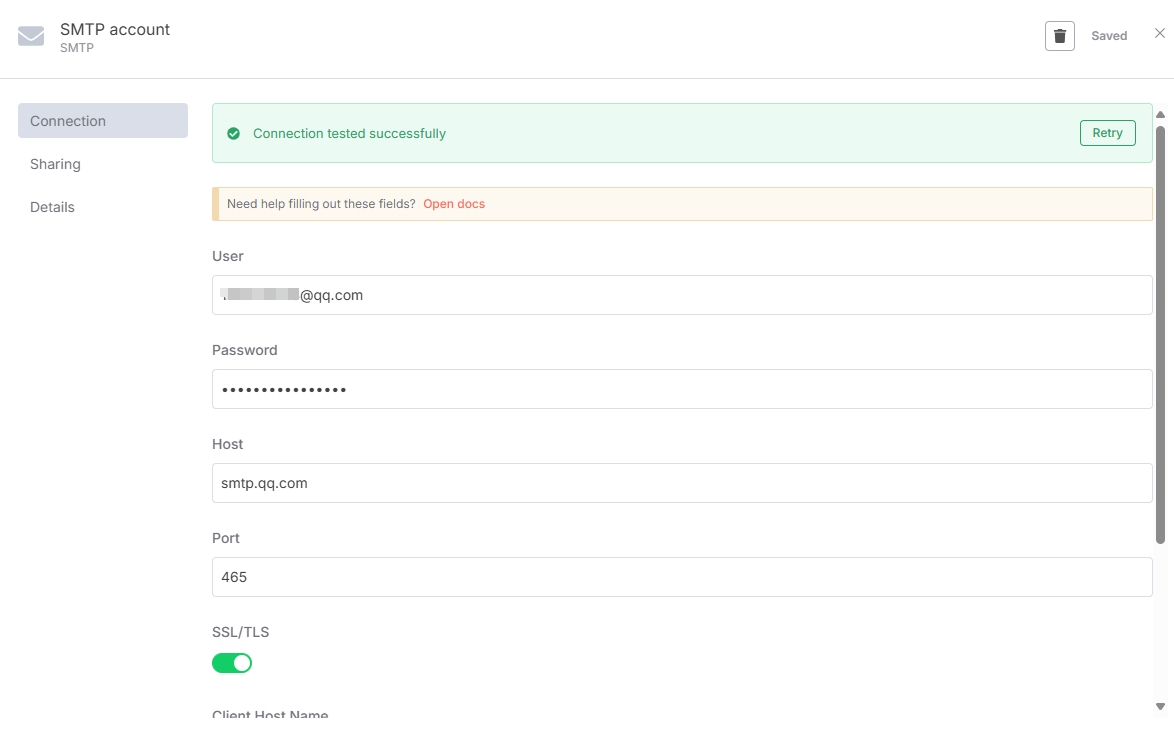
You can see the email was successfully saved.
In "Send Email", "From Email" must match the User email in credentials, and "To Email" should be the destination email address (can also send to yourself).
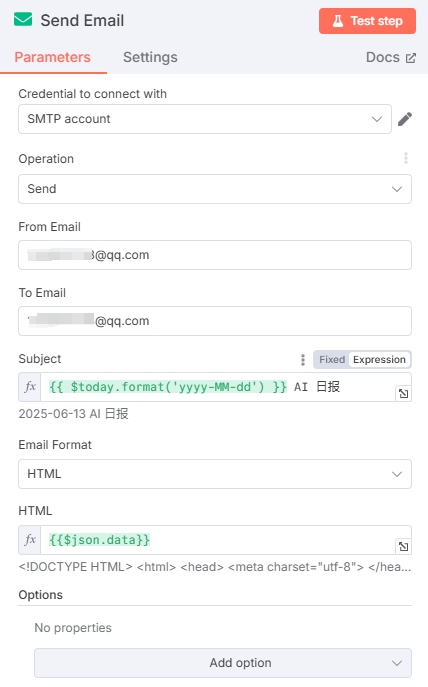
Since the large model output is mainly in Markdown format and email doesn't support Markdown, we added a Markdown to HTML conversion node between the newsletter generation and email nodes.
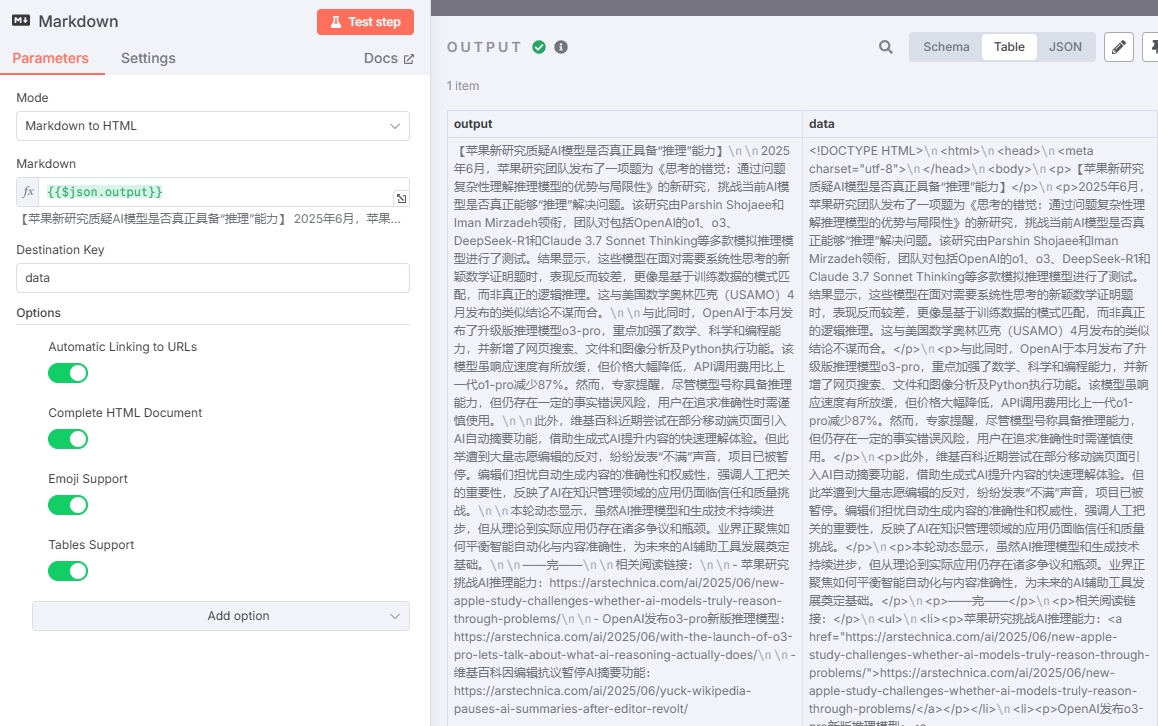
Final complete workflow:

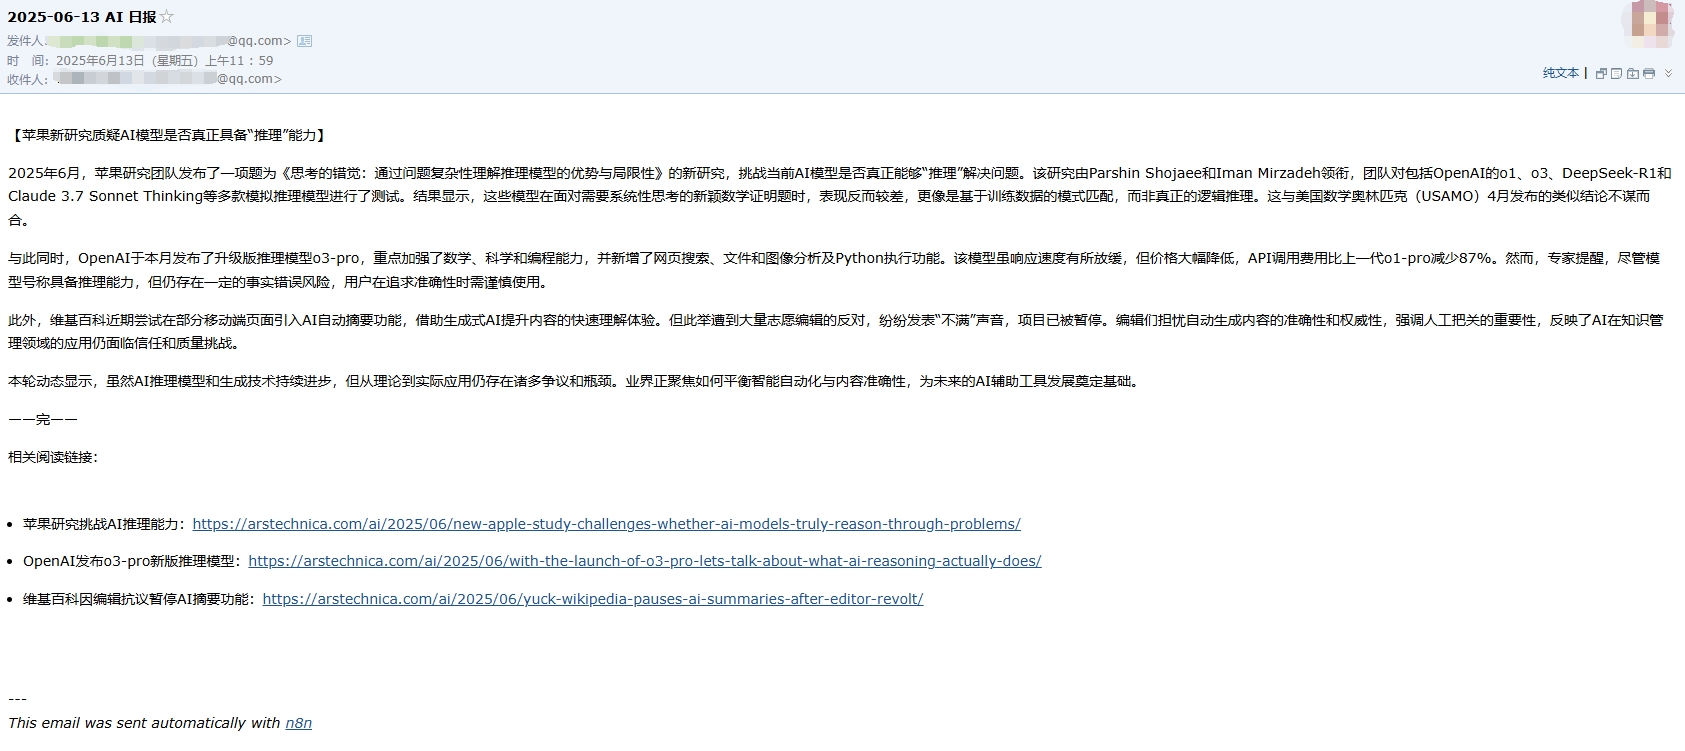
Check the email:
Conclusion
Through this detailed practical guide, we successfully built a complete AI newsletter automation generation system. This is not just a technical demonstration, but showcases n8n's powerful potential in AI workflow orchestration.
Mastering n8n + AI core skills is more than just a technical tool-it's a bridge connecting traditional business with AI capabilities. In the era of AI-native applications, such automation capabilities will become core competitive advantages for enterprises and individuals.
Start taking action! Begin by replicating this article's workflow, then gradually customize your own AI automation solutions. Remember, the best way to learn is through continuous iteration and optimization in practice.